Monthly Archives: June 2009

ASP.NET MVC QuickStart 7: action filters

…continued from part 6.

Objectives

In this Hands-On Lab, you will be introduced to the ASP.NET MVC framework. In particular, you will:

  • Task 1: understand action filters
  • Task 2: built-in action filters
  • Task 3: write a custom action filter

System requirements

You must have the following items to complete this lab:

  • Microsoft Visual Studio 2008 SP1 (professional edition)
  • Microsoft ASP.NET MVC 1.0

Prequisites

You must have the following skills to understand this lab:

  • Fundamental knowledge of software development in .NET 3.5
  • Some experience in ASP.NET web development

This lab builds further on the QuickStart 6 code.

Task 1: understand action filters

An action filter is behavior that can be attached to controllers and action methods. They inject extra logic in the request processing pipeline:

  • before and after an action method runs
  • before and after action results are executed
  • during exception handling

Action filters are very powerful if you want to inject general-purpose code that has to be reused all over the place, but implemented once, such as logging, authorization, caching and others.

The MVC framework knows about following filter types:

Filter type           Interface             When run                         
Authorization filter IAuthorizationFilter Before running any other
filter or action method
Action Filter IActionFilter Before and after an action
method is run
Result Filter IResultFilter Before and after an action
result is executed
Exception filter IExceptionFilter Handles exception thrown
by action filter, action
result or action method

The default implementations of these filter types are:

Filter type               Default implementation
Authorization filter AuthorizeAttribute
Action Filter ActionFilterAttribute
Result Filter ActionFilterAttribute
Exception filter HandleErrorAttribute

Task 2: built-in action filters

ASP.NET MVC has a number of built in action filters. To use them, you just need to decorate the controller or action filter with a specific action filter attribute, for example:

[Authorize()]
[OutputCache(Duration=60)]
public ActionResult Index()
{

}

In this particular example, we use the AuthorizeAttribute to specify that the Index action method can only be executed if the user is logged in. We have also decorated the action method Index with the OutputCacheAttribute, which will cache the output of the action method for a specific duration (60 seconds). These two action filters are filters that are already built-in into the ASP.NET MVC framework, but of course you can build your own action filters. Other built in action filters are: AcceptVerbs, Bind, HandleError, ModelBinder, NonAction and others.

Task 3: write a custom action filter

In this task we will create a custom action filter that logs the stages of a request to a controller action. To keep things simple, we will just write to the Visual Studio output window.

To start, add a new folder to the MvcApplication1 web application and call it ActionFilters. Right click this folder and select Add -> Class, and name it LogAttribute, and implement it with the following code:

using System;
using System.Collections.Generic;
using System.Linq;
using System.Web;
using System.Web.Mvc;
using System.Web.Routing;
using System.Diagnostics;
namespace MvcApplication1.ActionFilters
{
public class LogAttribute : ActionFilterAttribute,
IActionFilter, IResultFilter, IExceptionFilter
{
#region IActionFilter Members
void IActionFilter.OnActionExecuted(ActionExecutedContext filterContext)
{
Log("OnActionExecuted", filterContext.RouteData);
}
void IActionFilter.OnActionExecuting(ActionExecutingContext filterContext)
{
Log("OnActionExecuting", filterContext.RouteData);
}
#endregion
#region IResultFilter Members
void IResultFilter.OnResultExecuted(ResultExecutedContext filterContext)
{
Log("OnResultExecuted", filterContext.RouteData);
}
void IResultFilter.OnResultExecuting(ResultExecutingContext filterContext)
{
Log("OnResultExecuting", filterContext.RouteData);
}
#endregion
#region IExceptionFilter Members
public void OnException(ExceptionContext filterContext)
{
Log("OnException", filterContext.RouteData);
}
#endregion
#region Log
public static void Log(string message, RouteData routeData)
{
Trace.WriteLine(
string.Format("{0}, controller = {1}, action = {2}",
message,
routeData.Values["controller"],
routeData.Values["action"]));
}
#endregion
}
}

This code is very straightforward, notice the following:

  • the LogAttribute class inherits from ActionFilterAttribute, which provides you with the default implementation.
  • the LogAttribute class implements three interfaces: IActionFilter, IResultFilter and IExceptionFilter.
  • In each interface method the filter context is passed, that can be used to determine information about the context of where the method was triggered (controller, action method…).

Then add the following using statement on top of the MembersController:

using MvcApplication1.ActionFilters;

Now you can apply the Log action filter, for example, decorate the action method Index of the MembersController with it:

[Log]
public ActionResult Index()
{
// Get a list of members using the model
List<Member> members = MemberService.GetMembers();

// return this list to the default view
return View(members);
}

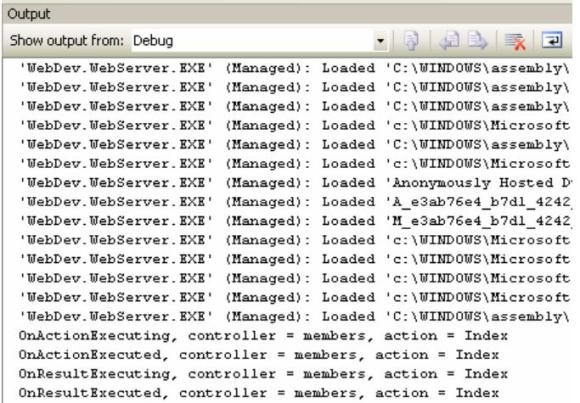
Hit F5 to start the web application, go to http://localhost:3382/members and have a look at the output window in visual studio:

Output window

As you see, the various steps in the pipeline have been written to the output window.

Note: if you would throw an exception in the Index action method, the OnException step would be executed too.

Go to next part.

ASP.NET MVC QuickStart 6: automated testing

…continued from part 5.

Objectives

In this Hands-On Lab, you will be introduced to the ASP.NET MVC framework. In particular, you will:

  • Task 1: add a unit test project
  • Task 2: Test model
  • Task 3: Test controller
  • Task 4: Test routing

System requirements

You must have the following items to complete this lab:

  • Microsoft Visual Studio 2008 SP1 (professional edition)
  • Microsoft ASP.NET MVC 1.0

Prequisites

You must have the following skills to understand this lab:

  • Fundamental knowledge of software development in .NET 3.5
  • Some experience in ASP.NET web development

This lab builds further on the QuickStart 5 code.

Task 1: add a unit test project

In previous QuickStarts we didn’t focus on testing, because the focus was on other aspects of ASP.NET MVC. But one of the biggest advantages of the MVC framework is that you can unit test everything. If you take the test-driven approach, you would first create your tests and then write the code to make those tests pass.

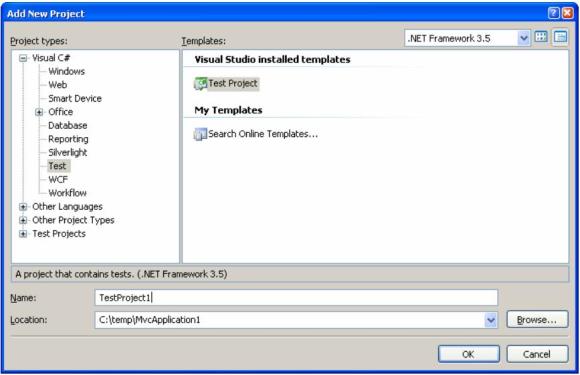
Let’s start off with adding a unit test project: right click the MvcApplication1 solution and select Add -> New project. Select Test Project in Test project types and fill in name and location:

Add new project

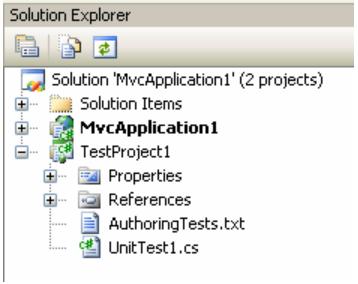
Click OK. A test project is now added to your solution:

TestProject1 project

Delete the generated UnitTest1.cs file. Also add a reference to the MvcApplication1 project, and to:

  • System.Web.Mvc
  • System.Web.Abstractions
  • System.Data
  • System.Data.DataSetExtensions
  • System.Web
  • System.Web.Routing

You should test every aspect of you project, in this case this means that you should test:

  • Model (MemberService)
  • Controller action methods (MemberController)
  • Routing

Task 2: Test model

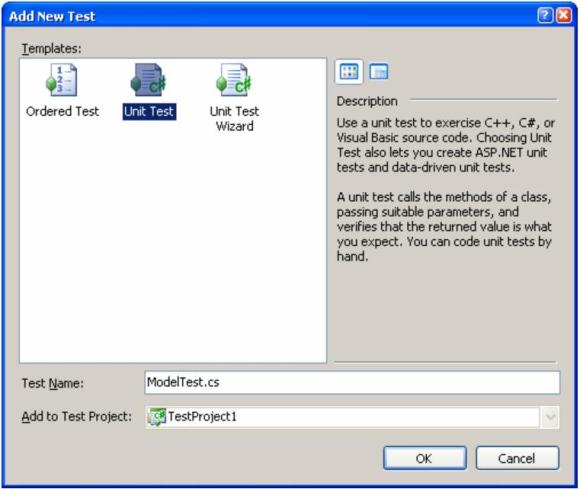
Right click the TestProject1 project and select Add -> New test:

Add new test

Select Unit Test and name it ModelTest.cs. Click OK. Add the following using statement on top of the ModelTest class:

using MvcApplication1.Models;

Then add some unit tests, like:

[TestMethod]
public void Get_Members_Returns_List()
{
var members = MemberService.GetMembers();
Assert.IsNotNull(members, "No members retrieved");
Assert.AreEqual(5, members.Count, "Got wrong number of members");
Assert.AreEqual("Geoffrey", members[0].FirstName);
Assert.AreEqual("Denver", members[0].LastName);
// ...
}
[TestMethod]
public void Delete_Member_Workd()
{
var members_before = MemberService.GetMembers();
MemberService.DeleteMember(members_before[0].ID);
var members_after = MemberService.GetMembers();
Assert.AreEqual(4, members_after.Count, "Member was not deleted");
// ...
}

Run these tests and make sure they pass.

Task 3: Test controller

Add a new unit test to the test project and call it MembersControllerTest. Add the following using statements on top:

using MvcApplication1.Controllers;
using MvcApplication1.Models;
using System.Web.Mvc;

Add the following tests:

[TestMethod]
public void Index_Presents_Correct_Page_Of_Members()
{
MembersController membersController = new MembersController();
ViewResult result = membersController.Index() as ViewResult;

Assert.IsNotNull(result, "Didn't render view");
var members = (IList<Member>)result.ViewData.Model;
Assert.AreEqual(5, members.Count, "Got wrong number of members");
Assert.AreEqual("Geoffrey", members[0].FirstName);
Assert.AreEqual("Denver", members[0].LastName);
}
[TestMethod]
public void Details_Presents_Correct_Page_Of_Member()
{
MembersController membersController = new MembersController();
ViewResult result = membersController.Details(0) as ViewResult;
Assert.IsNotNull(result, "Didn't render view");
var member = ((Member)result.ViewData.Model);
Assert.AreEqual("Geoffrey", member.FirstName);
Assert.AreEqual("Denver", member.LastName);
}

Run these tests and make sure they pass.

Task 4: Test routing

To test routing, we have to mock the request context. To do so, the easiest way is to use a mocking framework, and in this case we will be using moq, which can be downloaded from http://code.google.com/p/moq. Then, from the unit test project, add a reference to Moq.dll.

Add a new unit test and call it InboundRoutingTests.cs. On top of this class, add the following using statements:

using System.Web.Routing;
using MvcApplication1;
using System.Web;

Testing a specific route comes always down to the same:

  • registering the web application’s route collection
  • mocking the request context
  • get the mapped route based in the URL
  • test the mapped route to see if it matches expected values

So we’ll first add a method that accepts a URL and expected routing data values and tests whether the URL routing matches these expected values:

private void TestRoute(string url, object expectedValues)
{
// Arrange: Prepare the route collection and a mock request context
RouteCollection routes = new RouteCollection();
MvcApplication.RegisterRoutes(routes);
var mockHttpContext = new Moq.Mock<HttpContextBase>();
var mockRequest = new Moq.Mock<HttpRequestBase>();
mockHttpContext.Setup(x => x.Request).Returns(mockRequest.Object);
mockRequest.Setup(x =>
x.AppRelativeCurrentExecutionFilePath).Returns(url);
// Act: Get the mapped route
RouteData routeData = routes.GetRouteData(mockHttpContext.Object);
// Assert: Test the route values against expectations
Assert.IsNotNull(routeData);
var expectedDict = new RouteValueDictionary(expectedValues);
foreach (var expectedVal in expectedDict)
{
if (expectedVal.Value == null)
Assert.IsNull(routeData.Values[expectedVal.Key]);
else
Assert.AreEqual(expectedVal.Value.ToString(),

routeData.Values[expectedVal.Key].ToString());
}
}

And finally we can write unit tests to test different routes, for example:

[TestMethod]
public void Slash_Goes_To_All_Members_Page()
{
TestRoute("~/", new
{
controller = "Home",
action = "Index",
id = (string)null,
});
}
[TestMethod]
public void Member2_Goes_To_Member2_Details_Page()
{
TestRoute("~/member2", new
{
controller = "Members",
action = "Details",
id = 2,
});
}

Run these tests and make sure they pass.

Go to next part.

ASP.NET MVC QuickStart 5: routing

…continued from part 4.

Objectives

In this Hands-On Lab, you will be introduced to the ASP.NET MVC framework. In particular, you will:

  • Task 1: Understand routing
  • Task 2: Add constraint
  • Task 3: Add new route
  • Task 4: Generate outgoing URL’s

System requirements

You must have the following items to complete this lab:

  • Microsoft Visual Studio 2008 SP1 (professional edition)
  • Microsoft ASP.NET MVC 1.0

Prequisites

You must have the following skills to understand this lab:

  • Fundamental knowledge of software development in .NET 3.5
  • Some experience in ASP.NET web development

This lab builds further on the QuickStart 4 code.

Task 1: understand routing

In ASP.NET MVC, a URL does not map to a file, but on an action method of a controller. This routing from URL to controller/action can be configured in the routing table, that is configured in the RegisterRoutes method of the Global.asax.cs file in the web application project, which defaults to:

public static void RegisterRoutes(RouteCollection routes)
{
routes.IgnoreRoute("{resource}.axd/{*pathInfo}");
routes.MapRoute(
"Default", // Route name
"{controller}/{action}/{id}", // URL with parameters
new { controller = "Home",
action = "Index",
id = "" } // Parameter defaults
);
}

Note: the routing system not only maps incoming URL’S to the appropriate controller/action, but also constructs outgoing URLS!

Each route defines an URL pattern and how to handle requests for such URL’s. For the default route, this means:

URL                     Maps to
/ controller = Home, action = Index, id = “”
/members controller = Members, action = Index, id = “”
/members/create controller = Members, action = Create, id = “”
/members/details/2 controller = Members, action = Details, id = “2”

If you omit controller in the URL, it defaults to Home because we specified a parameter default for controller. If you omit action in the URL, it defaults to Index because we specified a parameter default for action.

When you define a route by using the MapRoute method, you can pass a number of parameters:

  • a route name, which is optional
  • the URL pattern, using parameters
  • default values: default value for each parameter (optional)
  • constraints: constraints for each parameter (optional)

Task 2: Add constraint

If you use http://localhost:3382/members/Details/2 then it will map to the Details action method of the MembersController, and member with ID 2 will be shown. This works, because ‘2’ will be mapped to the id parameter of the Details action method.

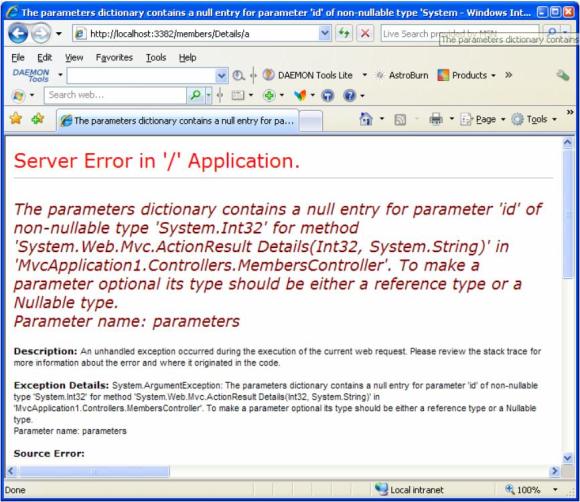
However, http://localhost:3382/members/Details/a also matches the URL pattern “{controller}/{action}/{id}” and so ‘a’ will be mapped to the id parameter. But, id is of type int, and so you will get the error:

Server error

Obviously, we know that id should be a valid number, but the routing system doesn’t know that. To solve this, we can add a constraint to be sure that the mapping is only done when id is a valid number:

routes.MapRoute(
"Default", // Route name
"{controller}/{action}/{id}", // URL with parameters
new { controller = "Home",
action = "Index",
id = 0 }, // Parameter defaults
new { id = @"d{1,6}" } // Constraints
);

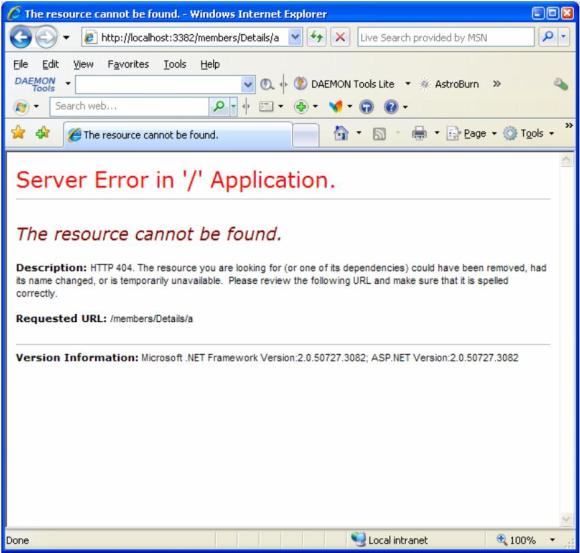
Now, if id is not according to the regular expression ‘d{1,6}’ (numeric, 1 to 6 digits long) then the rule does not match and  the URL http://localhost:3382/members/Details/a isn’t mapped:

Server error

Task 3: Add new route

Suppose we want the following URL to work:

URL         Maps to
/member1 controller = Members, action = Details, id = “1”
/member3 controller = Members, action = Details, id = “3”

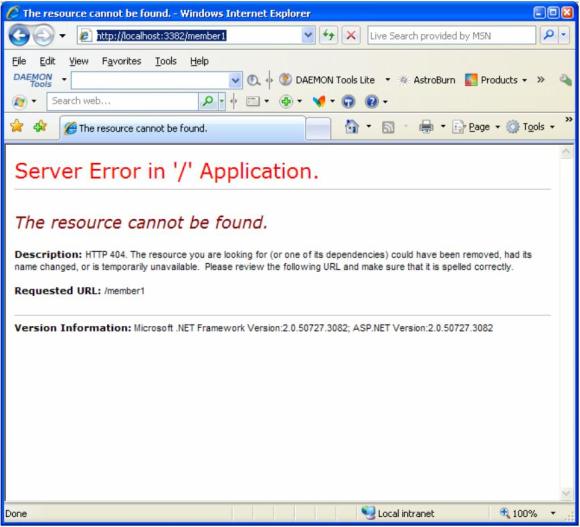
If you try that, obviously it does not match any URL pattern yet, so you’ll get an error:

Server error

To make this work, add a new route to the global.asax.cs file (it has to be the first one):

public static void RegisterRoutes(RouteCollection routes)
{
routes.IgnoreRoute("{resource}.axd/{*pathInfo}");
routes.MapRoute(
"", // Route name
"member{id}", // URL with parameters
new { controller = "Members",
action = "Details",
id = 0 }, // Parameter defaults
new { id = @"d{1,6}" } // Constraints
);
routes.MapRoute(
"Default", // Route name
"{controller}/{action}/{id}", // URL with parameters
new { controller = "Home",
action = "Index",
id = 0 }, // Parameter defaults
new { id = @"d{1,6}" } // Constraints
);
}

Note: add routes in the correct order: from most specific to least specific!

Now try http://localhost:3382/member3:

My MVC application

Task 4: Generate outgoing URL’s

Generating hyperlinks should never be done hardcoded, always use the built in helper methods like Html.ActionLink because they use the routing system to correctly build the URL.

In previous examples we already used Html.ActionLink to construct the links to view, create, edit and delete members, for example:

<%= Html.ActionLink("Details", "Details", new { id = item.ID }) %>

This generated the links as follows:

Generated links

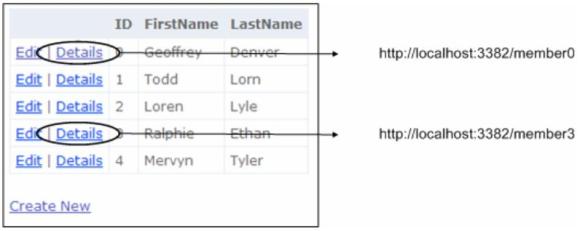
However, in task 3 we added a new route to view the details of a member, so that URL’s in the form of http://localhost:3382/member3 work. After adding this route, the generated URL’s look different:

Generated links

This is because Html.ActionLink uses the routing configuration to construct the URL’s.

Note: If we would have constructed the links hard coded, changing routing configuration may have broken those links!

Go to next part.

ASP.NET MVC QuickStart 4: implement validation

… continued from part 3.

Objectives

In this Hands-On Lab, you will create functionality to add validation of members. In particular, you will:

  • Task 1: understand validation
  • Task 2: add convenience method to ModelState
  • Task 3: implement validation logic in model
  • Task 4: handle validation errors in controller

System requirements

You must have the following items to complete this lab:

  • Microsoft Visual Studio 2008 SP1 (professional edition)
  • Microsoft ASP.NET MVC 1.0

Prequisites

You must have the following skills to understand this lab:

  • Fundamental knowledge of software development in .NET 3.5
  • Some experience in ASP.NET web development

This lab builds further on the QuickStart 3 code.

Task 1: understand validation

At this moment, when the user enters an empty first name and/or last name, everything works. Of course, we know that these properties are mandatory, so we have to add some validation logic to make sure that the user can’t enter invalid information.

Due to the separation of concerns, it is straightforward that this validation checking has to be done in the model, and that the view is responsible for showing any validation messages to the user. So what should happen is that the controller uses the model to do validation and then it passes the error information to the view.

Now, how can the controller pass error information to the view? The way to do this is by registering the errors in ModelState, which is a temporary storage area. The steps are:

  • Controller asks model to do validation and if validation fails, it receives the list of validation errors from the model.
  • Controller registers the validation errors in ModelState, by calling the ModelState.AddModelError method for each error. This will add all errors to the ModelStateDictionary.
  • The view has access to this ModelStateDictionary and you can use Html helper methods to display the information:
    • Html.ValidationSummary: returns a list of validation errors.
    • Html.ValidationMessage: returns validation message for specific field.

Task 2: add convenience method to ModelState

The ModelState.AddModelError method only allows adding one validation error at a time, so first we will create an extension method called ModelState.AddModelErrors that allows us to add a collection of validation errors in one method call.

Right click the web project MvcApplication1, and select Add -> New folder, and call it Helpers. Then right click the Helpers folder and select Add -> Class, and call it ModelStateHelpers.cs. Write the extension method as follows:

using System;
using System.Collections.Generic;
using System.Linq;
using System.Web;
using MvcApplication1.Models;
using System.Web.Mvc;
namespace MvcApplication1.Helpers
{
public static class ModelStateHelpers
{
public static void AddModelErrors(
this ModelStateDictionary modelState,
IEnumerable<RuleViolation> errors)
{
foreach (RuleViolation issue in errors)
{
modelState.AddModelError(
issue.PropertyName, issue.ErrorMessage);
}
}
}
}

Task 3: implement validation logic in model

Now we will create the validation logic in our model.

First we will create a new class that can hold information (property name and related error message) about a validation error. Add a new class called RuleValidation to the Models folder:

using System;
using System.Collections.Generic;
using System.Linq;
using System.Web;
namespace MvcApplication1.Models
{
public class RuleViolation
{
public string ErrorMessage { get; private set; }
public string PropertyName { get; private set; }
public RuleViolation(string errorMessage)
{
ErrorMessage = errorMessage;
}
public RuleViolation(string errorMessage, string propertyName)
{
ErrorMessage = errorMessage;
PropertyName = propertyName;
}
}
}

A very convenient way of telling whether there were validation errors is by throwing exceptions. So add a new class called RuleException to the Models folder, which is a special kind of exception that will hold all validation errors that have occurred:

using System;
using System.Collections.Generic;
using System.Linq;
using System.Web;
using System.Collections.Specialized;
namespace MvcApplication1.Models
{
public class RuleException : Exception
{
public IEnumerable<RuleViolation>
RuleViolations { get; private set; }
public RuleException(IEnumerable<RuleViolation> ruleViolations)
{
RuleViolations = ruleViolations;
}
}
}

Now it’s time to do the actual validation. Add the following two methods to the Member class in the Models folder:

public bool IsValid
{
get { return (GetRuleViolations().Count() == 0); }
}
public IEnumerable<RuleViolation> GetRuleViolations()
{
if (String.IsNullOrEmpty(FirstName))
yield return new RuleViolation(
"First name is required", "FirstName");
if (String.IsNullOrEmpty(LastName))
yield return new RuleViolation(
"Last name is required", "LastName");
yield break;
}

To keep things simple we demand that first name and last name have to be filled in.

Finally, we have to apply these validation checks in the MemberService operations. Add the following code to the CreateMember method in MemberService class in the Models folder:

public static void CreateMember(Member member)
{
if (!member.IsValid)
throw new RuleException(member.GetRuleViolations());
// Set member id to next free id
member.ID = members.Max(m => m.ID) + 1;
// add member to collection
members.Add(member);
}

And do the same in the UpdateMember method:

public static void UpdateMember(Member member)
{
if (!member.IsValid)
throw new RuleException(member.GetRuleViolations());
// Find member in collection
Member foundMember = members.Find(m => m.ID == member.ID);
// Update member
foundMember.FirstName = member.FirstName;
foundMember.LastName = member.LastName;
}

So when a new member is added or updated, before the actual creation or update happens the member object is checked to see if it’s valid – if it isn’t, a RuleException is thrown to the caller (which is the controller) that has to handle it.

Task 4: handle validation errors in controller

Modify code of the Create action method in the MembersController class as follows:

[AcceptVerbs(HttpVerbs.Post)]
public ActionResult Create(Member member)
{
try
{
// Use model to create this new member
MemberService.CreateMember(member);
// Redirect to Details action method and pass the new id
return RedirectToAction("Details", new { id = member.ID });
}
catch (RuleException ex)
{
ModelState.AddModelErrors(ex.RuleViolations);
return View(member);
}
}

And do the same for the Update action method:

[AcceptVerbs(HttpVerbs.Post)]
public ActionResult Edit(Member member)
{
try
{
// Use model to create this new member
MemberService.CreateMember(member);
// Redirect to Details action method and pass the new id
return RedirectToAction("Details", new { id = member.ID });
}
catch (RuleException ex)
{
ModelState.AddModelErrors(ex.RuleViolations);
return View(member);
}
}

Note: The method ModelState.AddModelErrors is the extension method that we wrote earlier, so in order to use it we also have to add a using statement on top of the MembersController class:

using MvcApplication1.Helpers;

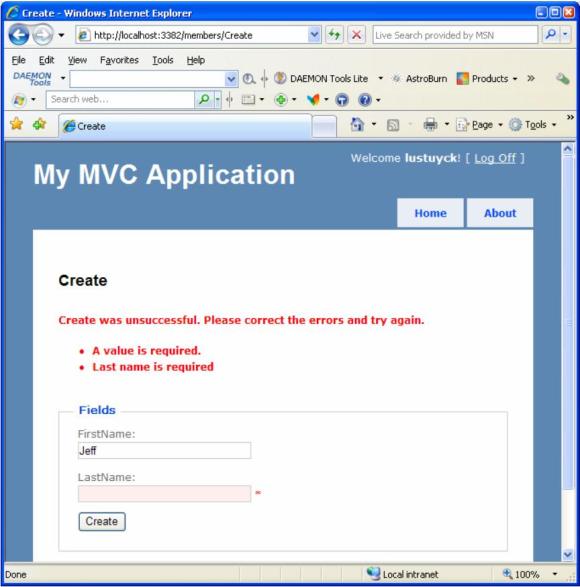
Right, let’s test this. Start the web application, and create a new member but don’t fill in last name:

My MVC application

Click Create.

My MVC application

The validation does its work and validation errors are displayed. But why does it also display the ‘A value is required’ message?

Actually, except for the manual validation messages that you add yourself, ASP.NET MVC also does its own validation checks on properties. There is a validation of all bound properties of a member object, which are FirstName, LastName but also… ID – because default, all properties of an object are bound to the view, even if this property is not used in the view. In our case, the ID is of type int, and therefore it cannot be null; so the validation message is added.

To solve this, we have to tell MVC not to bind the ID property, because it’s our responsibility to generate it. You can do this by decorating the Member class with the Bind attribute as follows:

[Bind(Include = "FirstName,LastName")]
public class Member
{
public int ID { get; set; }
public string FirstName { get; set; }
public string LastName { get; set; }

}

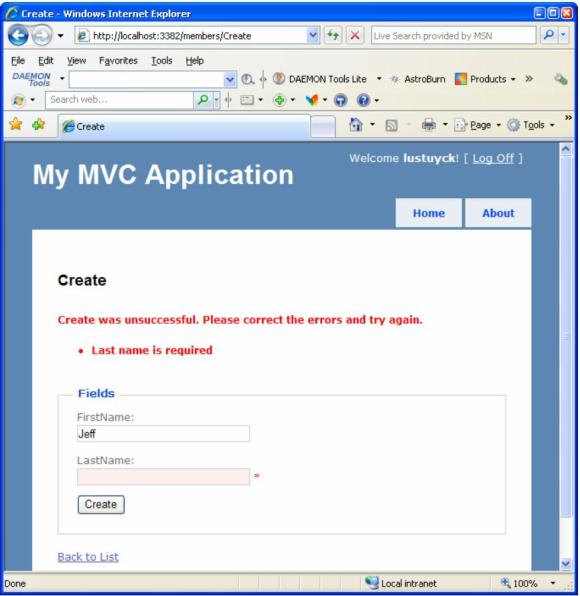
Now only FirstName and LastName properties are bound and validated; and so ID is not validated anymore:

My MVC application

Go to next part.

ASP.NET MVC QuickStart 3: Implement details, create, edit and delete functionality

…continued from part 2.

Objectives

In this Hands-On Lab, you will create functionality to display the details of a member and add admin functionality to add, edit and delete members. In particular, you will:

  • Task 1: making the Details link work
  • Task 2: making the Create New link work
  • Task 3: making the Edit link work
  • Task 4: making the Delete link work
  • Task 5: adding validation

System requirements

You must have the following items to complete this lab:

  • Microsoft Visual Studio 2008 SP1 (professional edition)
  • Microsoft ASP.NET MVC 1.0

Prequisites

You must have the following skills to understand this lab:

  • Fundamental knowledge of software development in .NET 3.5
  • Some experience in ASP.NET web development

This lab builds further on the QuickStart 2 code.

Task 1: making the Details link work

When you click on the Details link, you would expect to see a page with the details of that specific member.

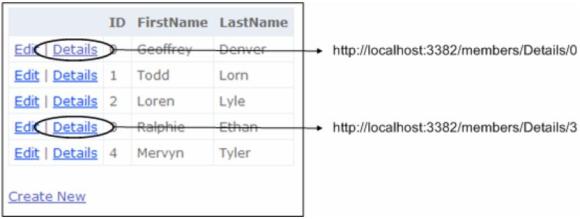
First, start the web application again and hover the Details links to see the URL each link refers to (generated by the Html.ActionLink methods):
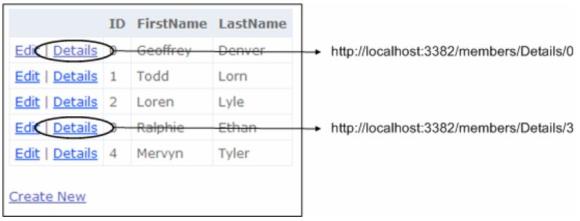
Details link

It’s interesting to see that these URL’s don’t use some exotic querystring to indicate the ID of the member; instead it’s a clean URL that is routed to the Details action method of the MembersController. So we’ll proceed by writing that action method to handle clicks on the Details links.

The first thing we need to do is to update our Model code so that we can retrieve the details of a member, because that’s the responsibility of the model. So open the MemberService class in the Model folder, and add the following method:

public static Member GetMember(int id)
{
return members.Find(m => m.ID == id);
}

This simply uses a lambda expression to find the member with specified id in the members collection.

Now we will create the controller action: open the MembersController class in the Controllers folder and add the following method:

public ActionResult Details(int id)
{
// Get member details for the specified member id
Member member = MemberService.GetMember(id);
// return this member to the default view
return View(member);
}

Finally we have to create the view that will show the member details. Right click the Details method and select Add View, and make sure everything is filled in as follows:
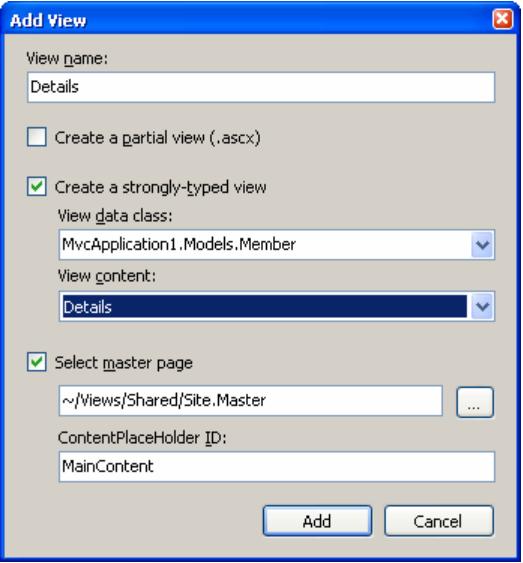
Add view

Make sure that:

  • The View name is called Details.
  • You check the Create a strongly typed view check box, and set the View data class to MvcApplication1.Models.Member. This way, we will be able to access the member data in the view in a strongly typed way.
  • Select Details as the View content. This will generate code that displays the details of a member.

Click Add. As a result, a Details.aspx view is added to the Views/Members folder:

<%@ Page Title="" Language="C#"
MasterPageFile="~/Views/Shared/Site.Master"
Inherits="System.Web.Mvc.ViewPage<
MvcApplication1.Models.Member>"
%>
<asp:Content ID="Content1" ContentPlaceHolderID="TitleContent"
runat="server">
Details
</asp:Content>
<asp:Content ID="Content2" ContentPlaceHolderID="MainContent"
runat="server">
<h2>Details</h2>
<fieldset>
<legend>Fields</legend>
<p>
ID:
<%= Html.Encode(Model.ID) %>
</p>
<p>
FirstName:
<%= Html.Encode(Model.FirstName) %>
</p>
<p>
LastName:
<%= Html.Encode(Model.LastName) %>
</p>
</fieldset>
<p>
<% =Html.ActionLink("Edit", "Edit", new
{ /* id=Model.PrimaryKey */ }) %> |
<%=Html.ActionLink("Back to List", "Index") %>
</p>
</asp:Content>

And again,  replace the documented code in the action links so that we assign the primary key to each member instance for the Edit link:

 
<%= Html.ActionLink("Edit", "Edit", new { id=Model.ID }) %> |

Put a breakpoint at the first line in the Details action method in the MembersController and hit F5 to debug the application. Change the url to http://localhost:3382/members/index and click on the Details link of a specific member. When the breakpoint hits, you can see that the id parameter of the action method equals the id of that specific member:

Breakpoint

Now how does the action method knows this id? This is because of model binding feature of ASP.NET MVC. Your action methods need data, and the incoming HTTP request carries the data it needs, which can be in the form of query string, posted form values and so on. So if you click such link, a new request is created containing the id; and the DefaultModelBinder automatically takes that member id out of the request and maps it to the id parameter of the action method. It can do so because both parameter name and action link value have the same name:
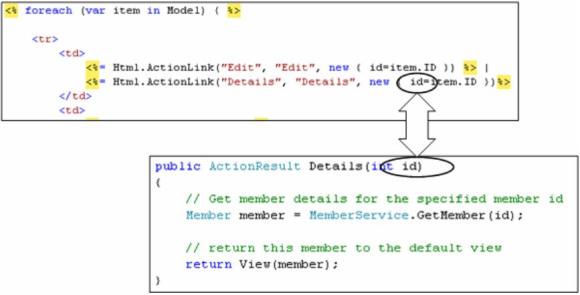
Model binding

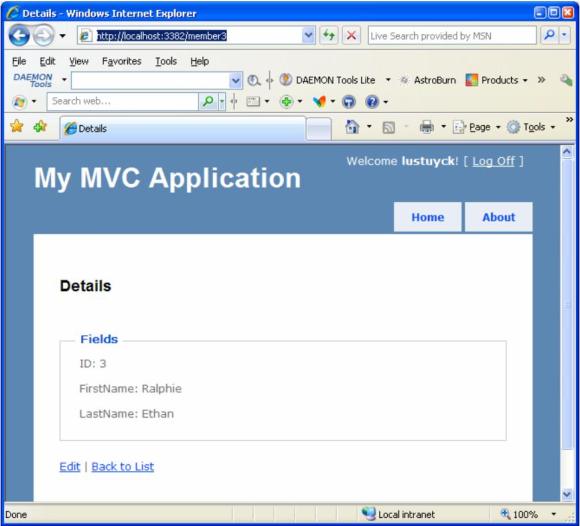
So continue to debug the code to see how the correct member is retrieved using the MemberService,  and how the resulting member is passed to the default view. As a result, the Details view is rendered:
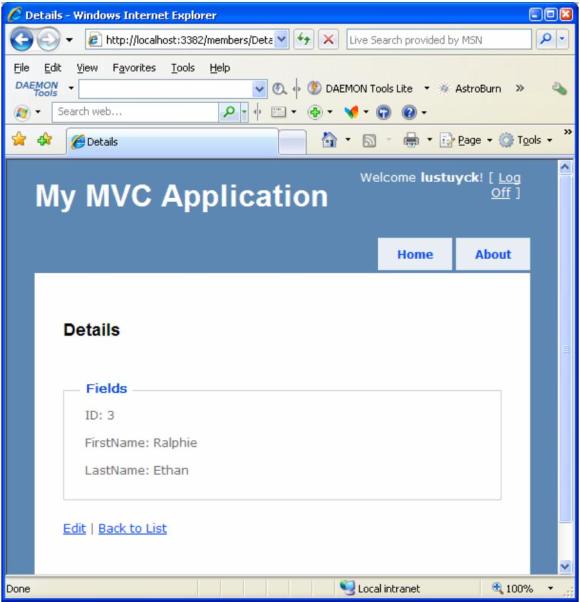
My MVC application

Note: The Back To List link already works, because it was implemented for us:

<%=Html.ActionLink("Back to List", "Index") %>

Task 2: making the Create New link work

First, update our Model code so that we can create a new member. Open the MemberService class in the Model folder, and add the following method:

public static void CreateMember(Member member)
{
// Set member id to next free id
member.ID = members.Max(m => m.ID) + 1;
// add member to collection
members.Add(member);
}

This method takes care of adding a new member to the collection and making sure it gets a valid id.

Then, in the Index.aspx view in the Views/Members folder, the Create New link looks like:

<%= Html.ActionLink("Create New", "Create") %>

The second parameter is the name of the action method, so this means that we have to create a new action method Create in the MembersController class (if we don’t specify the controller name explicitly, it will take the current one, which is fine in this case):

public ActionResult Create()
{
return View();
}

If the Create New link is clicked, the Create action method of the MembersController will be executed, and in this method we just return the default view for creating new members. This view does not exist yet, so right click the Create action method and select Add View, and make sure everything is filled in as follows:
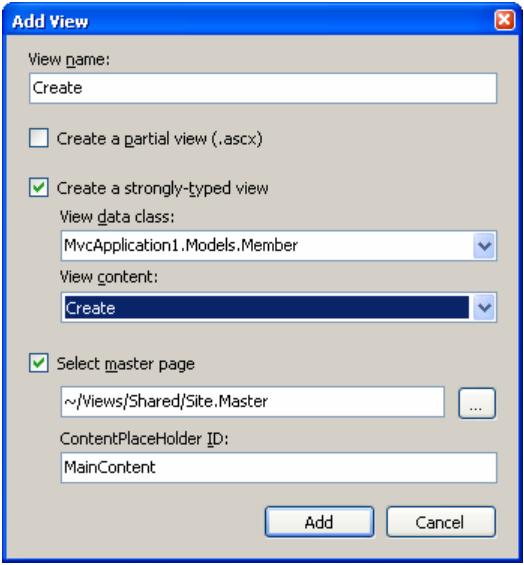
Add view

Make sure that:

  • The View name is called Create.
  • You check the Create a strongly typed view check box, and set the View data class to MvcApplication1.Models.Member. This way, we will be able to access the member data in the view in a strongly typed way.
  • Select Create as the View content. This will generate code that displays the creation of a member.

Click Add and a new view called Create.aspx will be added to the Views/Members folder:

<%@ Page Title="" Language="C#"
MasterPageFile="~/Views/Shared/Site.Master"
Inherits="System.Web.Mvc.ViewPage<
MvcApplication1.Models.Member>"
%>
<asp:Content ID="Content1" ContentPlaceHolderID="TitleContent"
runat="server">
Create
</asp:Content>
<asp:Content ID="Content2" ContentPlaceHolderID="MainContent"
runat="server">
<h2>Create</h2>
<%= Html.ValidationSummary("Create was unsuccessful. Please correct
the errors and try again."
) %>
<% using (Html.BeginForm()) { %>
<fieldset>
<legend>Fields</legend>
<p>
<label for="ID">ID:</label>
<%= Html.TextBox("ID") %>
<%= Html.ValidationMessage("ID", "*") %>
</p>
<p>
<label for="FirstName">FirstName:</label>
<%= Html.TextBox("FirstName") %>
<%= Html.ValidationMessage("FirstName", "*") %>
</p>
<p>
<label for="LastName">LastName:</label>
<%= Html.TextBox("LastName") %>
<%= Html.ValidationMessage("LastName", "*") %>
</p>
<p>
<input type="submit" value="Create" />
</p>
</fieldset>
<% }
%>
<div>
<%=Html.ActionLink("Back to List", "Index") %>
</div>
</asp:Content>

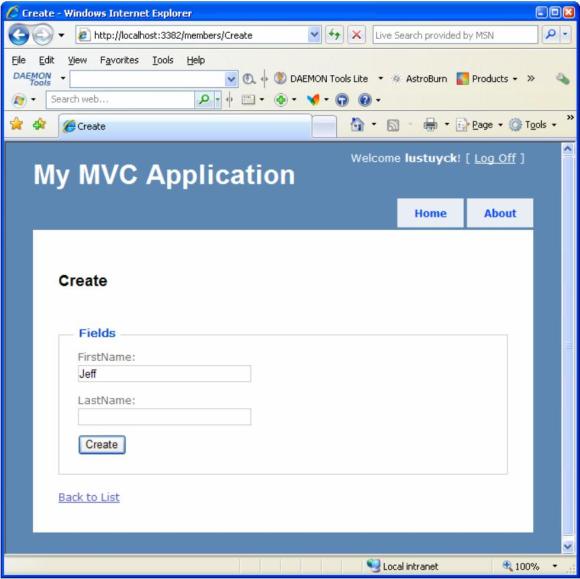
To try this view, run the application, go to http://localhost:3382/members/index and click the Create New link. Or, immediately type in the url http://localhost:3382/members/Create:
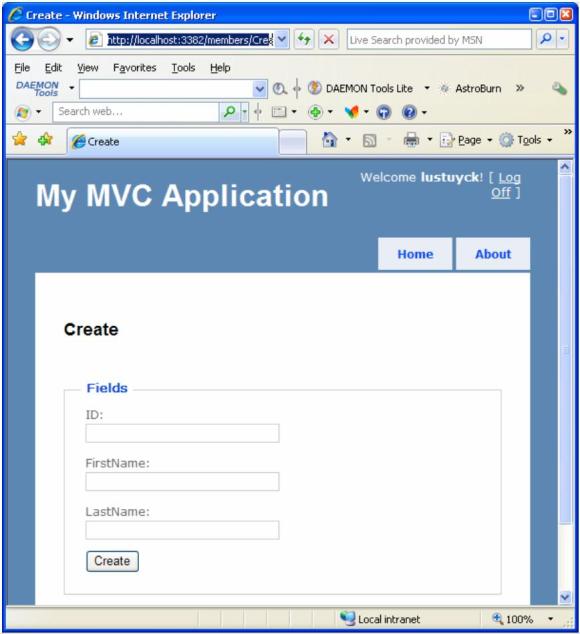
My MVC application

Note: The id property of a member is auto-generated by the data access layer, so you can safely delete this in the view because a user should not be able to fill this in.
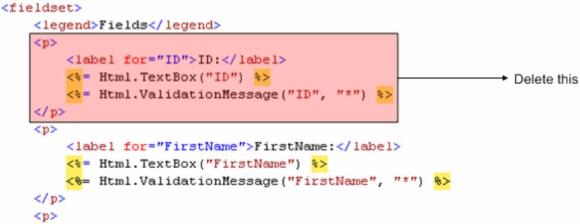
Delete part

This view uses the Html.TextBox helper to generate textboxes to fill in the required data.

Also notice the Html.BeginForm statement:

<% using (Html.BeginForm()) { %>

which will generate a form-element:
<form action=”/members/Createmethod=”post></form>

So, when the Create button is clicked (which is of input type submit), a new POST request to http://localhost/members/create is triggered and all form data will be passed with it. This means that the action method Create of the MembersController will be executed. But hold on… again? When we clicked the Create New link previously, this same action method was executed? What is happening?

To understand how it works, you have to know the difference between GET and POST requests. When we clicked the Create New link, a new GET request was triggered, causing the Create action method to execute. We could have explicitly written the Create action method as:

[AcceptVerbs(HttpVerbs.Get)]
public ActionResult Create()
{
return View();
}

If you don’t specify the AcceptVerbs attribute, it defaults to HttpVerbs.Get. That’s why the Create New link executes the Create action method when clicked.

But now, when clicking the Create button, we have the intention of creating a new member – which is potentially an unsafe operation, and therefore should be handled by a POST request instead of a GET request. Indeed, the generated Create button triggers a POST request, and in order to handle it, we have to create a new Create action method in the MembersController but this time decorated with HttpVerbs.Get, and accepting a member parameter.

[AcceptVerbs(HttpVerbs.Post)]
public ActionResult Create(Member member)
{
// Use model to create this new member
MemberService.CreateMember(member);
// Redirect to Details action method and pass the new id
return RedirectToAction("Details", new { id = member.ID });
}

Again, thanks to model binding the member parameter is created and its properties (FirstName and LastName) are initialized with the data from the form – so we don’t have to do anything special to get the data out of the request.  Then, the model is used to actually create the new member and then a RedirectToAction result is returned to trigger a redirection passing the name of the action method to redirect to (Details) and the data to be passed to this action method (the id).

Previously we already wrote this Details action method, so it will already work: when the new member is created, its details will be shown.

Test it: run the application, and create a new member:
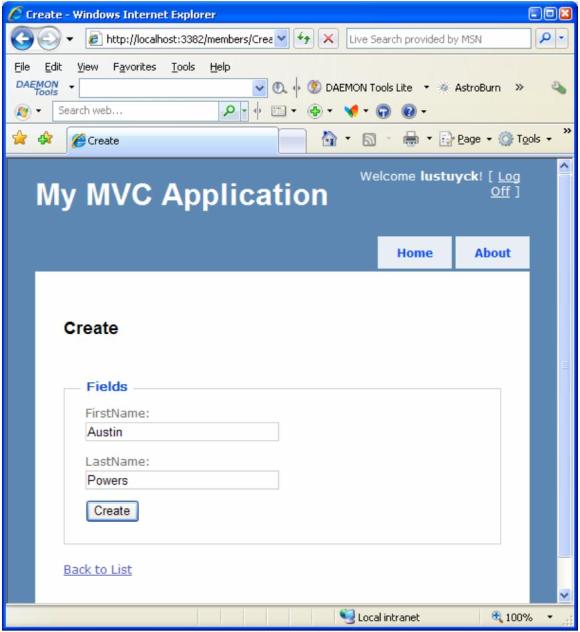
My MVC application

When you click Create, the member will be created and you will be redirected to the details view:
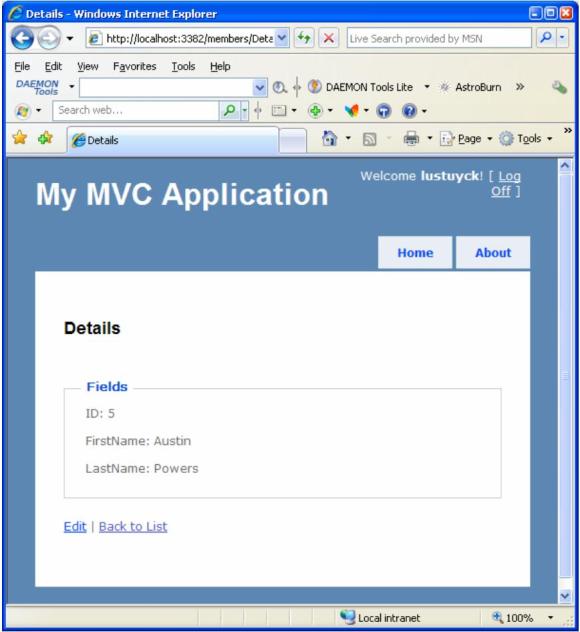
My MVC application

As you see, the id was generated fine. Now click the Back to List link, and the new member will be visible in the list:
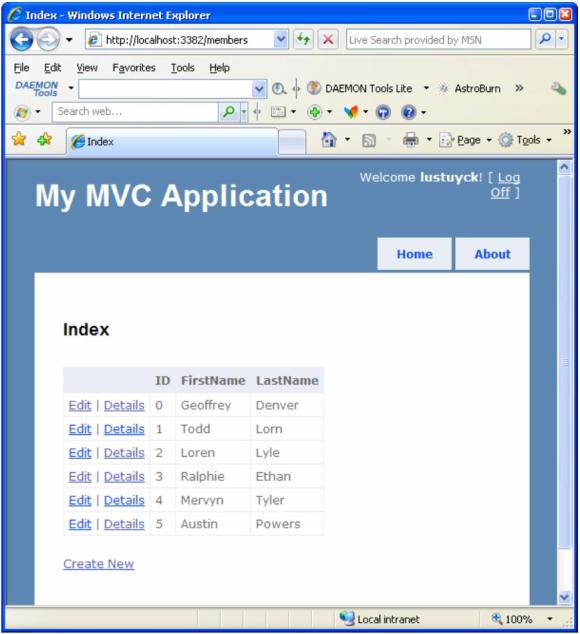
My MVC application

Task 3: making the Edit link work

Update our Model code so that we can update an existing member. Open the MemberService class in the Model folder, and add the following method:

public static void UpdateMember(Member member)
{
// Find member in collection
Member foundMember = members.Find(m => m.ID == member.ID);
// Update member
foundMember.FirstName = member.FirstName;
foundMember.LastName = member.LastName;
}

The Edit link in the Index.aspx view looked like:

<%= Html.ActionLink("Edit", "Edit", new { id=item.ID }) %>

This means that we have to add a new action method called Edit to the MembersController that will handle the GET request (and show the form to edit a member):

[AcceptVerbs(HttpVerbs.Get)]
public ActionResult Edit(int id)
{
// Get member details using model
Member member = MemberService.GetMember(id);
// Return default view and pass member
return View(member);
}

If the Edit link is clicked, the Edit action method of the MembersController will be executed, and in this method we first get the member details for the passed member id, and then return the default view for editing a member. This view does not exist yet, so right click the Edit action method and select Add View, and make sure everything is filled in as follows:
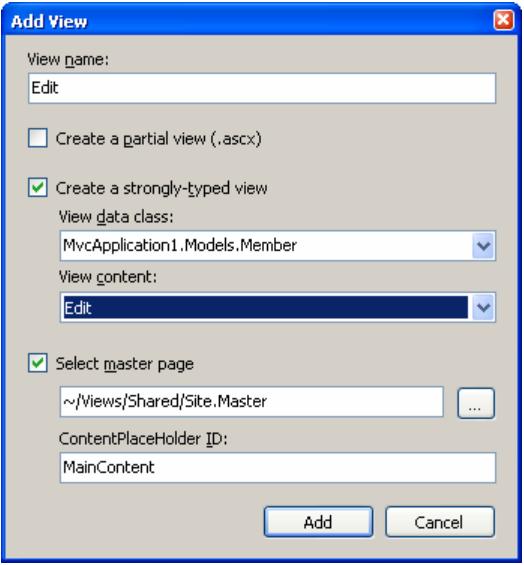
Add view

Make sure that:

  • The View name is called Edit.
  • You check the Create a strongly typed view check box, and set the View data class to MvcApplication1.Models.Member. This way, we will be able to access the member data in the view in a strongly typed way.
  • Select Edit as the View content. This will generate code that displays the editing of a member.

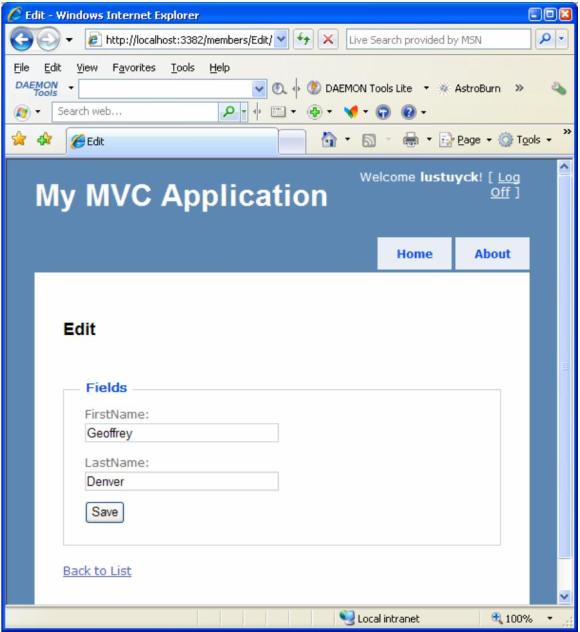
Click Add, and the Edit.aspx view will be created in the folder Views/Members. In this view, remove the id like you did in the Create view, because we don’t want users modifying it. Run the application and click the Edit link next to a member:
My MVC application

So change first name and/or last name and click Save. Guess what? An error is shown, because – you guessed it – we didn’t write code to handle the POST request yet.

Add new action method called Edit again but this time to handle POST request (and actually saves the updated member using the model). Open the MembersController class and add the following action method:

[AcceptVerbs(HttpVerbs.Post)]
public ActionResult Edit(Member member)
{
// Use model to update this existing member
MemberService.UpdateMember(member);
// Redirect to Details action method and pass the id
return RedirectToAction("Details", new { id = member.ID });
}

Run the application again, and rename Loren Lyle to Laura Lyle:
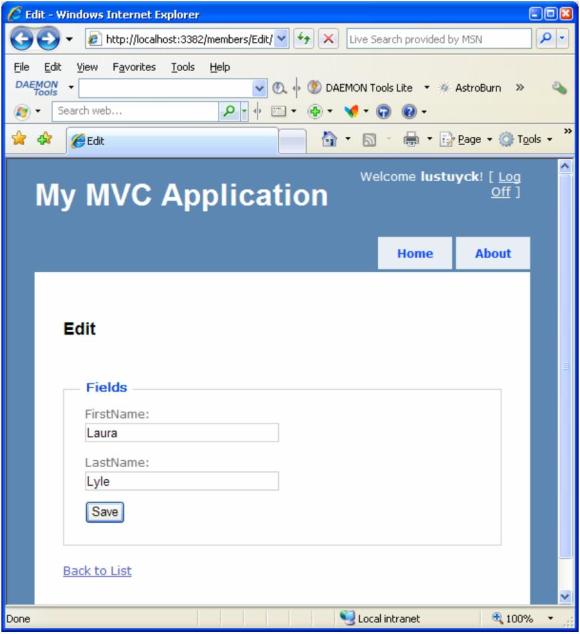
My MVC application

Click Save:

My MVC application

And if you go back to the list, it will also display the new name:
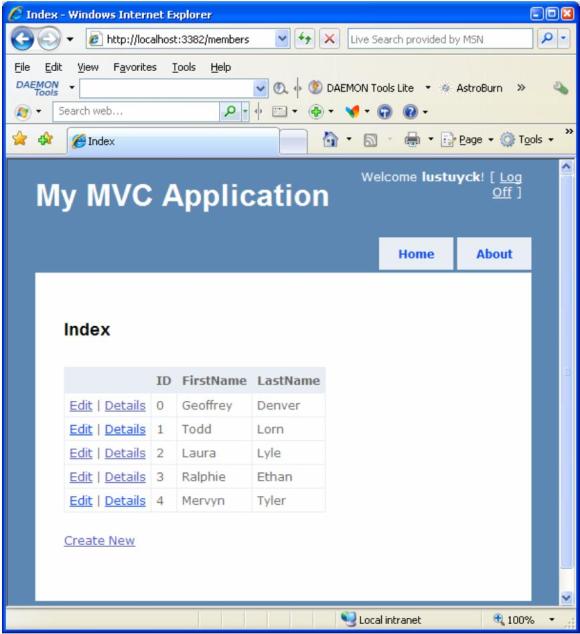
My MVC application

Task 4: making the Delete link work

As always, first update our Model code so that we can delete an existing member. Open the MemberService class in the Model folder, and add the following method:

public static void DeleteMember(int id)
{
// Find member in collection
Member memberToDelete = GetMember(id);
// Delete member
members.Remove(memberToDelete);
}

There wasn’t a Delete  link in the Index.aspx view yet, so we will add it now:

Add delete link

This means that we have to add a new action method called Delete to the MembersController that will handle the GET request (and show the form to delete the member):

[AcceptVerbs(HttpVerbs.Get)]
public ActionResult Delete(int id)
{
// Get member details using model
Member member = MemberService.GetMember(id);
// Return default view and pass member
return View(member);
}

If the Delete link is clicked, the Delete action method of the MembersController will be executed, and in this method we first get the member details for the passed member id, and then return the default view for deleting a member. This view does not exist yet, so right click the Delete action method and select Add View, and make sure everything is filled in as follows:
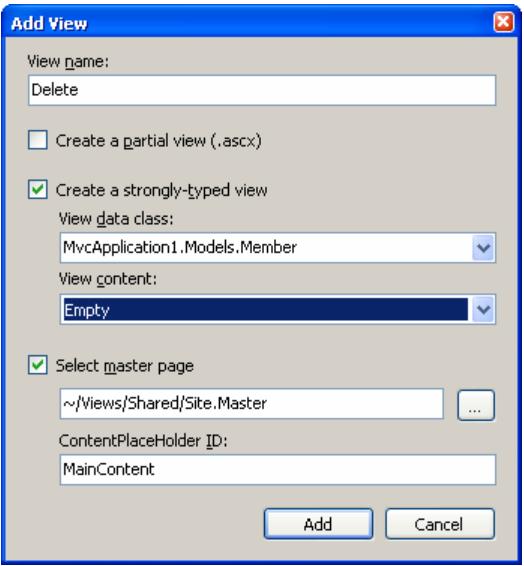
Add view

Make sure that:

  • The View name is called Delete.
  • You check the Create a strongly typed view check box, and set the View data class to MvcApplication1.Models.Member. This way, we will be able to access the member data in the view in a strongly typed way.
  • Select Empty as the View content. We will add some HTML manually.

Click Add, and the Delete.aspx view will be created in the folder Views/Members. Make this view look like:

<%@ Page Title="" Language="C#"
MasterPageFile="~/Views/Shared/Site.Master"
Inherits="System.Web.Mvc.ViewPage<
MvcApplication1.Models.Member>"
%>
<asp:Content ID="Content1" ContentPlaceHolderID="TitleContent"
runat="server">
Delete
</asp:Content>
<asp:Content ID="Content2" ContentPlaceHolderID="MainContent"
runat="server">
<h2>Delete</h2>
Do you really want to delete <%= Model.FirstName %>
<%= Model.LastName %>?
<%using (Html.BeginForm(new { id = Model.ID })) { %>
<p>
<input type="submit" value="Delete" />
</p>
<% } %>
<div>
<%=Html.ActionLink("Back to List", "Index") %>
</div>
</asp:Content>

To handle the actual Delete, add new action method called Delete again but this time to handle POST request (and actually deletes the requested member using the model). Open the MembersController class and add the following action method:

[AcceptVerbs(HttpVerbs.Post)]
public ActionResult Delete(Member member)
{
// Use model to delete this existing member
MemberService.DeleteMember(member.ID);
// Redirect to Index action method
return RedirectToAction("Index");
}

That should do it! Run the application, and delete the member Todd Lorn:
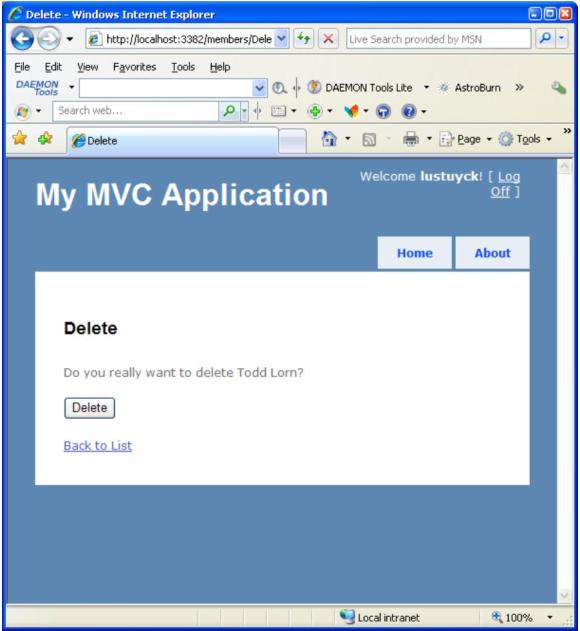
My MVC application

Click Delete, and the member will be deleted:
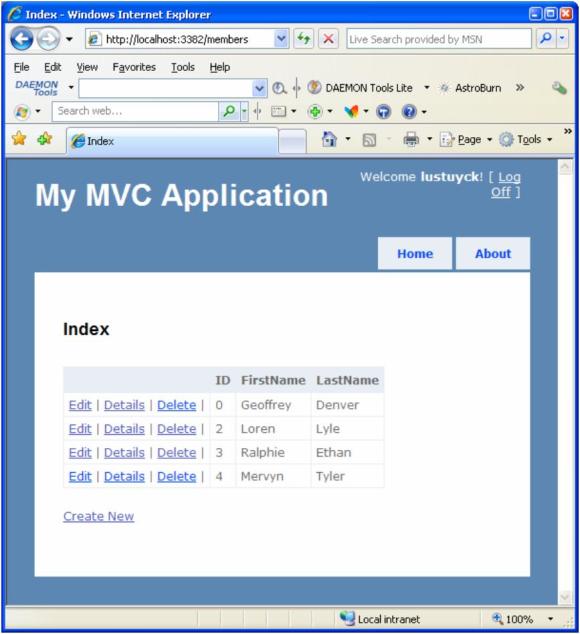
My MVC application

Go to next part.