Objectives
In this Hands-On Lab, you will be introduced to the Castle MicroKernel/Windsor framework. In particular, you will:
- Understand IoC and DI
- Download Castle Windsor
- Create a test application
- Use configuration file
System requirements
You must have the following items to complete this lab:
- Microsoft Visual Studio 2008 SP1
Prequisites
You must have the following skills to understand this lab:
- Fundamental knowledge of software development in .NET 3.5
Understand IoC and DI
Inversion of Control (IoC) and Dependency Injection (DI) are two related practices in software development which are known to lead to higher testability and maintainability of software products.
In the traditional way of coding, you instantiate the objects you want to use, so this means that at compile time you know which are the real classes you are going to interact with – you call them directly. So it means that you are in control, and not the consumers of your code. If you invert this, it would mean that you don’t know what the real classes are: someone else (the consumer) decides which will be the real classes, and how they will be instantiated. In this case you don’t know the concrete classes, but you only know the interfaces, and you don’t care about the actual implementation that is used. Therefore there are less dependencies and the coupling in a system is reduced. In fact, the control of dependency creation is pushed outside of the class itself. It is all about removing dependencies from your code.
A simple example: have a look at the following code:
public class Car
{
  Engine engine;
  public Car()
  {
    engine = new Engine();
  }
}
We have a extremely strongly dependency between Car and Engine, because the Engine is instantiated in the Car, so we can’t install any other engine inside this car. To make this code better, we change it slightly:
public class Car
{
  IEngine engine;
  public Car(IEngine engine)
  {
    this.engine = engine;
  }
}
Notice the difference? The control of creation of the engine has been moved out of the car. Now the code that creates the car also chooses the engine: this is inversion of control. Inversion of control is also known as the Hollywood principle: ‘don’t call me, I call you’, so in this case it’s like the Engine class saying to the Car class: ‘don’t create me, I will be created by someone else’.
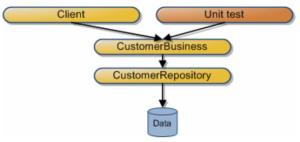
Another concrete (simplified) example: in the following picture, a client uses the CustomerBusiness component, which uses the CustomerRepository component to access the database. You see that CustomerBusiness has a hard reference to the concrete CustomerRepository:
Now imagine that we want to add unit tests to test the business component:
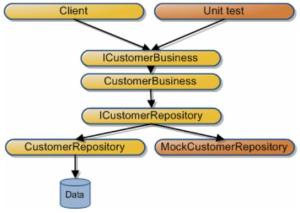
Now we have a problem, because when we test the business component we don’t want it to use the real CustomerRepository but a mock implementation of it. In the current architecture, we do not have this flexibility. To solve this, we can use the IoC pattern: let the Client and Unit test decide which repository the business component should use. So, the CustomerBusiness component no longer decides what repository it uses. To achieve this, we create a ICustomerRepository interface. This interface is then implemented by the CustomerRepository (this implementation uses the real database) and also by the MockCustomerRepository (this implementation uses no database, but mock data). The CustomerBusiness component now has only a reference to the ICustomerRepository interface, and it doesn’t know what the real implementation is, and it doesn’t care:
The control of which repository is used is inverted to the client (wants the business component to use CustomerRepository) and the unit test (wants the business component to use MockCustomerRepository).
In a further step we can do the same for every component: create your interface first and then one or more implementations. So in our example also the business component can be abstracted, although we have only one implementation at this time:
- loose coupling between components: you share contracts, not implementations
- flexibility: it’s easy to change behavior
- easy to test components: replace dependencies by mocking components so that you can really test what you want to test
- improve code reuse: each component has its responsibility
- extensibility: future changes can be implemented easily by injecting new implementations
Download Castle
You need the Castle Project assemblies on your local machine, so download the project release at http://www.castleproject.org/castle/download.html.
Create a test application
We are going to create a simple test application to demonstrate the basics of Castle. Start Visual Studio and create a new console application called CastleExample. Add references to the following assemblies:
- Castle.Core.dll
- Castle.DynamicProxy2.dll
- Castle.MicroKernel.dll
- Castle.Windsor.dll
We are going to implement the example from previous chapter in a simple way, focusing on how to use Castle to achieve dependency injection. We start by defining the domain object for customer, so add a new class Customer:
using System;
using System.Collections.Generic;
using System.Linq;
using System.Text;

namespace CastleExample
{
    public class Customer
    {
        public int Id{ get; set; }
        public string FirstName { get; set; }
        public string LastName { get; set; }
    }
}
Then we design the interface for the customer repository. Add a new class ICustomerRepository:
using System;
using System.Collections.Generic;
using System.Linq;
using System.Text;
namespace CastleExample
{
    public interface ICustomerRepository
    {
        Customer CreateCustomer(Customer customer);
        List<Customer> ReadCustomers();
        void DeleteCustomer(int Id);
    }
}
using System;
using System.Collections.Generic;
using System.Linq;
using System.Text;
namespace CastleExample
{
    public class CustomerRepository : ICustomerRepository
    {
        #region ICustomerRepository Members
        public Customer CreateCustomer(Customer customer)
        {
            // TO DO: Create customer in database here
            Console.WriteLine("CreateCustomer in CustomerRepository");
            return null;
        }
        public List<Customer> ReadCustomers()
        {
            // TO DO: Read customers from database here
            Console.WriteLine("ReadCustomers in CustomerRepository");
            return null;
        }
        public void DeleteCustomer(int Id)
        {
            // TO DO: Delete customer in database here
            Console.WriteLine("DeleteCustomer in CustomerRepository");
        }
        #endregion
    }
}
using System;
using System.Collections.Generic;
using System.Linq;
using System.Text;
namespace CastleExample
{
    public class MockCustomerRepository : ICustomerRepository
    {
        #region ICustomerRepository Members
        public Customer CreateCustomer(Customer customer)
        {
            // Mock a newly created customer
            Console.WriteLine("CreateCustomer in MockCustomerRepository");
            return null;
        }
        public List<Customer> ReadCustomers()
        {
            // Mock a list of customers
            Console.WriteLine("ReadCustomers in MockCustomerRepository");
            return null;
        }
        public void DeleteCustomer(int Id)
        {
            // Mock delete
            Console.WriteLine("DeleteCustomer in MockCustomerRepository");
        }
        #endregion
    }
}
using System;
using System.Collections.Generic;
using System.Linq;
using System.Text;
using Castle.Windsor;
namespace CastleExample
{
    class Program
    {
        private static IWindsorContainer container;
        static void Main(string[] args)
        {
            // Register components
            container = new WindsorContainer();
            container.AddComponent<ICustomerRepository,
                     CustomerRepository>("customer.repository");
            // Use repository
            UseRegisteredRepository();
        }
        public static void UseRegisteredRepository()
        {
            // Get the actual registered customer repository
            ICustomerRepository customerRepository =
                    container.Resolve<ICustomerRepository>();
            customerRepository.ReadCustomers();
        }
    }
}
Now let’s change this so that the MoclCustomerRepository is used:
static void Main(string[] args)
{
    // Register components
    container = new WindsorContainer();
    container.AddComponent<ICustomerRepository,
                   MockCustomerRepository>("customer.repository");

   // Use repository     UseRegisteredRepository();
}
Let’s add the business component. Again, first add a class ICustomerBusiness for the interface:
using System;
using System.Collections.Generic;
using System.Linq;
using System.Text;
namespace CastleExample
{
    public interface ICustomerBusiness
    {
        Customer AddCustomer(Customer customer);
        List<Customer> GetCustomers();
        void RemoveCustomer(int Id);
    }
}
using System;
using System.Collections.Generic;
using System.Linq;
using System.Text;
namespace CastleExample
{
    public class CustomerBusiness : ICustomerBusiness
    {
        private ICustomerRepository customerRepository;
        public CustomerBusiness(ICustomerRepository customerRepository)
        {
            // using constructor injection the concrete customer repository is injected
            this.customerRepository = customerRepository;
        }
        #region ICustomerBusiness Members
        public Customer AddCustomer(Customer customer)
        {
            return customerRepository.CreateCustomer(customer);
        }
        public List<Customer> GetCustomers()
        {
            return customerRepository.ReadCustomers();
        }
        public void RemoveCustomer(int Id)
        {
            customerRepository.DeleteCustomer(Id);
        }
        #endregion
    }
}
Note that we never instantiate the customer repository that is to be used. Instead, in the constructor we accept a parameter of type ICustomerRepository, and we use that in the business component without caring about what the real implementation looks like. Thanks to constructor injection, the real object to be used will be injected by the caller.
Finally, modify Program.cs to test this:
using System;
using System.Collections.Generic;
using System.Linq;
using System.Text;
using Castle.Windsor;
namespace CastleExample
{
    class Program
    {
        private static IWindsorContainer container;
        static void Main(string[] args)
        {
            // Register components
            container = new WindsorContainer();
            container.AddComponent<ICustomerBusiness,
                            CustomerBusiness>("customer.business");
            container.AddComponent<ICustomerRepository,
                       MockCustomerRepository>("customer.repository");
            // Use repository
            UseRegisteredRepository();
            // Use business
            UseRegisteredBusiness();
        }
        public static void UseRegisteredRepository()
        {
            // Get the actual registered customer repository
            ICustomerRepository customerRepository =
                container.Resolve<ICustomerRepository>();
            customerRepository.ReadCustomers();
        }
        public static void UseRegisteredBusiness()
        {
            // Get the actual registered customer business
            ICustomerBusiness customerBusiness =
               container.Resolve<ICustomerBusiness>();
            customerBusiness.GetCustomers();
        }
    }
}
Now the Main method decides what business component will be used (CustomerBusiness), and what repository component will be used (MockCustomerRepository). When the CustomerBusiness object is created, Castle notices that it has a constructor that accepts an interface (ICustomerRepository) and injects the actual implementation for this interface as configured in the beginning of the Main method.
Run the application again to see if the second line in the console output is indeed MockCustomerRepository:
To summarize, what we have done it enabled the client to choose which actual implementations of ICustomerBusiness and ICustomerRepository it wants to use. The business component itself only knows the interface of the repository, not the actual implementation. It means that we now have a way to easily change the implementation: a real client would register the real CustomerRepository, a unit test would register the MockCustomerRepository.
To demonstrate another form of injection, property injection, create a new class Tester that contains our testing methods and also two properties customerBusiness and customerRepository :
public class Tester
{
  // These properties will be injected
  public ICustomerBusiness customerBusiness { get; set;}
  public ICustomerRepository customerRepository { get; set; }
  public void UseRegisteredRepository()
  {
    // Get the actual registered customer repository
    customerRepository.ReadCustomers();
  }

  public void UseRegisteredBusiness()
  {
    // Get the actual registered customer business
    customerBusiness.GetCustomers();
  }
}
and change the Main() method as follows:
static void Main(string[] args)
{
  // Register components
  container = new WindsorContainer();
  container.AddComponent<ICustomerBusiness,
         CustomerBusiness>("customer.business");
  container.AddComponent<ICustomerRepository,
         MockCustomerRepository>("customer.repository");
  container.AddComponent<Tester, Tester>("tester");
  Tester tester = container.Resolve<Tester>();
  tester.UseRegisteredRepository();
  tester.UseRegisteredBusiness();
}
As you can see the Tester class has to properties that will be injected automatically by Castle when they are used.
Note however that the use of constructor injection is preferred, because when you use this you have an explicit indication of a dependency that has to be fulfilled – you know it at compile time. If you use property injection, run-time exceptions may occur.
Use configuration file
In the previous example we used code to configure the container, but of course we have more flexibility if we would be able to do that in a configuration file.
Add a configuration file to the project, and add a section to configure Windsor Container:
<?xml version="1.0" encoding="utf-8" ?>
<configuration>
  <configSections>
    <section
        name="castle"
        type="Castle.Windsor.Configuration.AppDomain.CastleSectionHandler,
              Castle.Windsor" />
  </configSections>
  <castle>
    <components>
    </components>
  </castle>
</configuration>
Then add the components we need:
<?xml version="1.0" encoding="utf-8" ?>
<configuration>
  <configSections>
    <section
        name="castle"
        type="Castle.Windsor.Configuration.AppDomain.CastleSectionHandler,
              Castle.Windsor" />
  </configSections>
  <castle>
    <components>
      <component
           id="customer.business"
           service="CastleExample.ICustomerBusiness, CastleExample"
           type="CastleExample.CustomerBusiness, CastleExample" />
      <component
          id="customer.repository"
          service="CastleExample.ICustomerRepository, CastleExample"
          type="CastleExample.MockCustomerRepository, CastleExample" />
    </components>
  </castle>
</configuration>
Finally, we need to create the Windsor Container passing a configuration interpreter and a resource in the Main method:
using System;
using System.Collections.Generic;
using System.Linq;
using System.Text;
using Castle.Core.Resource;
using Castle.Windsor;
using Castle.Windsor.Configuration.Interpreters;
namespace CastleExample
{
    class Program
    {
        private static IWindsorContainer container;
        static void Main(string[] args)
        {
            // Register components
            container =
                new WindsorContainer(
                    new XmlInterpreter(new ConfigResource("castle")));

            // Use repository
            UseRegisteredRepository();
            // Use business
            UseRegisteredBusiness();
        }
        public static void UseRegisteredRepository()
        {
            // Get the actual registered customer repository
            ICustomerRepository customerRepository =
                container.Resolve<ICustomerRepository>();
            customerRepository.ReadCustomers();
        }
        public static void UseRegisteredBusiness()
        {
            // Get the actual registered customer business
            ICustomerBusiness customerBusiness =
                container.Resolve<ICustomerBusiness>();
            customerBusiness.GetCustomers();
        }
    }
}
Run the application and it will now use the configuration file.
In the next part we will investigate LifeStyle and LifeCycle.


